728x90
728x90
1. Multi-Head Attention
- 입력 임베딩 생성
- 각 레이어 내부의 처리 절차
- 레이어 정규화 (Layer Normalization)
- 목적: 신경망 훈련을 안정화하고 속도를 높임.
- 멀티헤드 셀프-어텐션 (Multi-Head Self-Attention)
- Query, Key, Value 벡터 생성 (병렬 처리)
- 어텐션 스코어 계산 (각 헤드에서 독립적으로):
- 미래 토큰에 대한 정보가 유출되지 않도록 마스킹을 적용하고 마스킹된 스코어에 소프트맥스 함수를 적용하여 어텐션 가중치를 생성한다.
- 가중치 합산 (각 헤드에서 독립적으로)
- 헤드 결합 (Concatenation) 및 선형 변환:
- 여러 헤드가 독립적으로 추출한 다양한 종류의 관계 정보를 통합하고, 이를 다음 레이어의 입력에 적합한 형태로 변환한다.
- 잔차 연결 (Residual Connection) & 레이어 정규화 (Layer Normalization)
- 목적: 깊은 신경망에서 그래디언트 손실 문제를 완화하고, 정보 흐름을 원활하게 하여 학습을 돕는다.
- 피드포워드 신경망 (Feed-Forward Neural Network)
- 정규화된 어텐션 출력은 피드포워드 신경망을 통과한다.
- 목적: 어텐션 레이어에서 통합된 문맥 정보를 더욱 복잡한 비선형 방식으로 변환하고, 모델의 표현력을 높인다.
- 최종 잔차 연결 및 레이어 정규화 (최종 출력)
- 레이어 정규화 (Layer Normalization)
📌 레이어별 처리의 의미
- 계층적 추상화: 각 레이어는 입력 문장에 대한 다른 수준의 추상화를 학습한다.
- 낮은 레이어: 주로 표면적인 문법적 관계 (주어-동사 일치, 수식 관계, 품사 정보 등)에 집중하는 경향이 있다. 토큰들의 직접적인 인접 관계나 단어 형태에 반응하는 패턴이 나타날 수 있다.
- 높은 레이어: 더 복잡하고 추상적인 의미적, 문맥적 관계를 파악하는 경향이 있다. 장거리 의존성(문장 내 멀리 떨어진 단어 간의 관계), 대명사 해결, 감성/의도 파악 등 전반적인 문맥 이해에 기여한다.
- 다양한 관점: 각 레이어 내의 멀티헤드 어텐션은 여러 헤드가 동시에 작동함으로써, 동일한 입력에 대해 다양한 종류의 관계 (예: 한 헤드는 주어-동사, 다른 헤드는 장소-동사)에 '주의'를 기울여 문장을 다각도로 이해하고 풍부한 표현을 학습한다.
=> 이러한 단계를 거쳐 트랜스포머 모델은 입력 문장의 각 단어에 대한 문맥 정보를 효과적으로 통합하고, 이를 다음 레이어로 전달하여 점진적으로 더 깊은 수준의 언어 이해를 달성하게 된다.
import torch
import torch.nn.functional as F
from transformers import AutoTokenizer, AutoModel
import numpy as np
from IPython.display import display, HTML
from google.colab import files # Colab에서 파일 다운로드를 위해 필요
# 1. 모델 및 토크나이저 로드 (skt/kogpt2-base-v2 사용)
MODEL_NAME = "skt/kogpt2-base-v2"
tokenizer = AutoTokenizer.from_pretrained(MODEL_NAME)
model = AutoModel.from_pretrained(MODEL_NAME, output_attentions=True, attn_implementation="eager")
print(f"로드된 모델: {MODEL_NAME}")
print(f"모델 레이어 수: {model.config.n_layer}")
print(f"모델 헤드 수: {model.config.n_head}")
# --- 어텐션 가중치를 표로 출력하고 분석하는 함수 (HTML 문자열 반환으로 변경) ---
def get_attention_table_and_analyze_html(tokens, attention_weights, layer_idx, head_idx, sentence_context=""):
"""
어텐션 가중치를 HTML 테이블로 표시하고, 해당 헤드의 잠재적 의미를 분석하여 HTML 문자열로 반환합니다.
Args:
tokens (list): 토큰 문자열 리스트.
attention_weights (torch.Tensor): 어텐션 가중치 텐서 (seq_len, seq_len).
layer_idx (int): 현재 레이어의 인덱스 (0-based).
head_idx (int): 현재 헤드의 인덱스 (0-based).
sentence_context (str): 문장 전체에 대한 맥락 제공.
Returns:
str: 생성된 HTML 문자열.
"""
html_output = "" # 이 함수에서 생성된 HTML을 누적할 변수
title = f"<h3>레이어 {layer_idx + 1}, 헤드 {head_idx + 1} 어텐션 가중치</h3>"
# 'Ġ' 제거하여 가독성 높임
header_tokens = [token.replace('Ġ', '') for token in tokens]
header = "<th>Query / Key</th>" + "".join([f"<th>{t}</th>" for t in header_tokens])
rows = []
for i, query_token in enumerate(tokens):
row_data = "".join([f"<td>{val:.3f}</td>" for val in attention_weights[i].tolist()])
rows.append(f"<tr><th>{query_token.replace('Ġ', '')}</th>{row_data}</tr>")
table_html = f"""
{title}
<table style="width:100%; border-collapse: collapse; text-align: center;">
<tr style="background-color:#f2f2f2;">{header}</tr>
{''.join(rows)}
</table>
"""
html_output += table_html # HTML 내용 누적
# --- 어텐션 스코어 분석 ---
analysis_html = f"<h4>레이어 {layer_idx + 1}, 헤드 {head_idx + 1} 분석:</h4>"
analysis_points = []
# 가장 높은 스코어 추출
max_scores, max_indices = torch.max(attention_weights, dim=1)
for i, query_token in enumerate(tokens):
# 특수 토큰 제외 및 'Ġ' 제거
cleaned_query_token = query_token.replace('Ġ', '')
if cleaned_query_token.strip() in ['<s>', '</s>', '.', ',', '!', '?', '<pad>']:
continue
target_token = tokens[max_indices[i]].replace('Ġ', '')
score = max_scores[i].item()
# 스코어 임계값에 따른 분석 (조정 가능)
if score > 0.7: # 매우 높은 스코어
if cleaned_query_token == target_token:
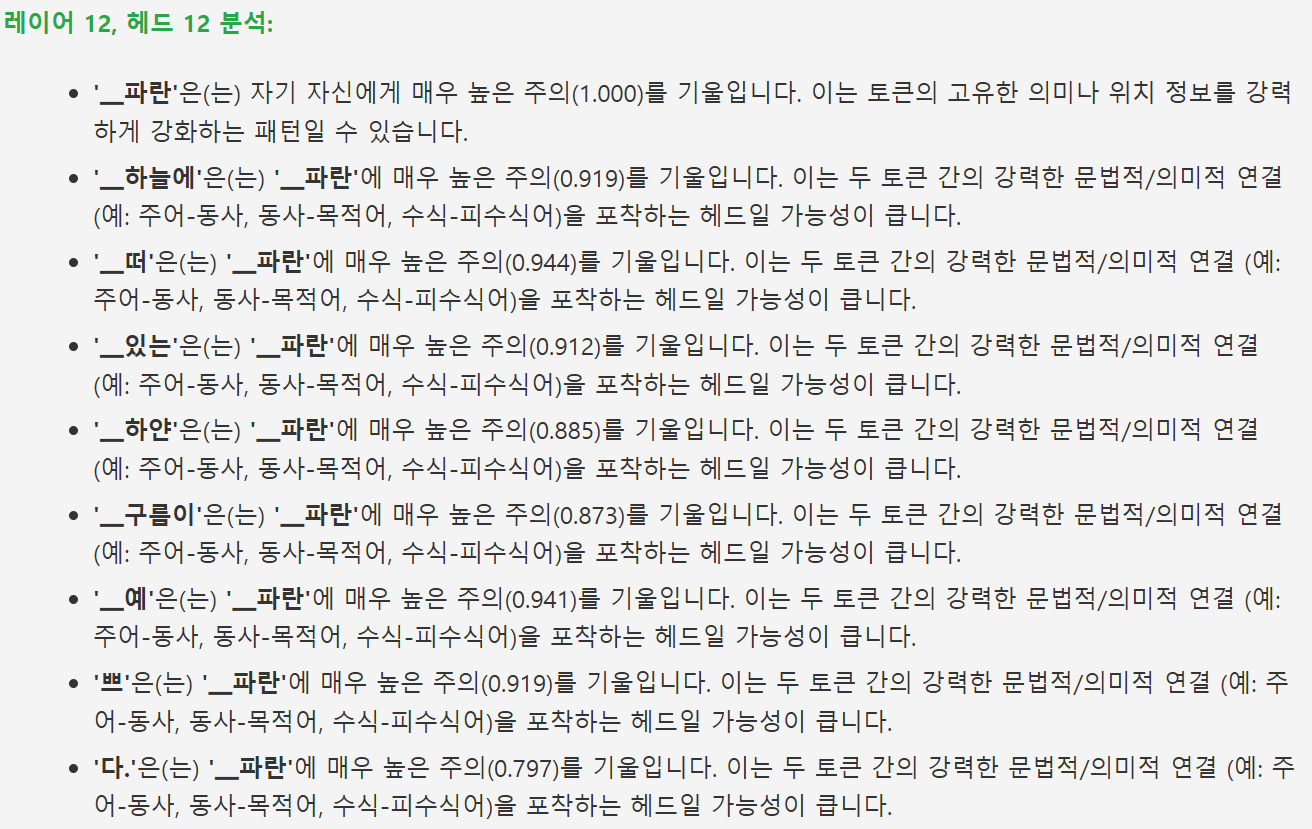
analysis_points.append(f"<b>'{cleaned_query_token}'</b>은(는) 자기 자신에게 매우 높은 주의({score:.3f})를 기울입니다. 이는 토큰의 고유한 의미나 위치 정보를 강력하게 강화하는 패턴일 수 있습니다.")
else:
analysis_points.append(f"<b>'{cleaned_query_token}'</b>은(는) <b>'{target_token}'</b>에 매우 높은 주의({score:.3f})를 기울입니다. 이는 두 토큰 간의 강력한 문법적/의미적 연결 (예: 주어-동사, 동사-목적어, 수식-피수식어)을 포착하는 헤드일 가능성이 큽니다.")
elif score > 0.4: # 중간 스코어
if cleaned_query_token == target_token:
analysis_points.append(f"<b>'{cleaned_query_token}'</b>은(는) 자기 자신에게 중간 수준의 주의({score:.3f})를 기울이며, 주변 토큰에도 분산됩니다. 이는 자신의 의미를 기반으로 주변 맥락을 넓게 탐색하는 패턴일 수 있습니다.")
else:
analysis_points.append(f"<b>'{cleaned_query_token}'</b>은(는) <b>'{target_token}'</b>에 중간 수준의 주의({score:.3f})를 기울입니다. 이 헤드는 특정 핵심 관계와 더불어 광범위한 문맥 정보를 수집하거나, 여러 관련어 중 주요 후보를 탐색하는 데 기여할 수 있습니다.")
else: # 낮은 스코어 (고르게 분포된 경우)
analysis_points.append(f"<b>'{cleaned_query_token}'</b>은(는) 다양한 토큰에 비교적 고르게 주의를 분산({score:.3f} 이하)하고 있습니다. 이 헤드는 특정 핵심 관계보다는 문장 전체의 전반적인 맥락이나 흐름을 파악하는 데 초점을 맞출 수 있습니다.")
if not analysis_points:
analysis_html += "<p>이 헤드는 주로 특수 토큰에 집중하거나, 모든 토큰에 매우 고르게 주의를 분산하여 명확한 문법적/맥락적 패턴이 두드러지지 않습니다.</p>"
else:
analysis_html += "<ul>" + "".join([f"<li>{point}</li>" for point in analysis_points]) + "</ul>"
analysis_html += "<p><i>(참고: 학습된 모델의 어텐션 패턴 분석입니다. 각 헤드는 문장의 다른 측면을 포착하며, 낮은 레이어는 문법적 관계에, 높은 레이어는 더 추상적인 의미에 집중하는 경향이 있습니다.)</i></p><hr>"
html_output += analysis_html # HTML 내용 누적
return html_output # 생성된 HTML 반환
# --- 어텐션 시각화 및 분석 함수 (HTML 파일 저장) ---
def analyze_attention_and_save_html(sentence, file_name="attention_analysis.html"):
print(f"\n--- 문장: '{sentence}' ---")
# 토큰화 및 모델 입력 준비
inputs = tokenizer(sentence, return_tensors="pt", add_special_tokens=True)
input_ids = inputs["input_ids"]
attention_mask = inputs["attention_mask"]
# 모델 실행하여 어텐션 가중치 가져오기
with torch.no_grad():
outputs = model(input_ids, attention_mask=attention_mask)
attentions = outputs.attentions
# 토큰 문자열로 변환 (시각화를 위해)
tokens = tokenizer.convert_ids_to_tokens(input_ids[0])
print(f"토큰화된 문장: {tokens}")
print(f"총 {len(attentions)}개 레이어의 어텐션 정보.")
# HTML 파일에 쓸 내용을 저장할 리스트
all_html_content = []
# 전체 파일의 헤더 및 스타일
all_html_content.append(f"""
<!DOCTYPE html>
<html lang="ko">
<head>
<meta charset="UTF-8">
<meta name="viewport" content="width=device-width, initial-scale=1.0">
<title>어텐션 분석 결과 - '{sentence}'</title>
<style>
body {{ font-family: 'Malgun Gothic', 'Apple Color Emoji', 'Segoe UI Emoji', sans-serif; line-height: 1.6; margin: 20px; background-color: #f4f4f4; color: #333; }}
h1 {{ color: #0056b3; }}
h3 {{ color: #007bff; margin-top: 30px; border-bottom: 1px solid #eee; padding-bottom: 5px; }}
h4 {{ color: #28a745; margin-top: 15px; }}
table {{ width: 100%; border-collapse: collapse; margin-top: 10px; background-color: #fff; box-shadow: 0 0 10px rgba(0,0,0,0.1); }}
th, td {{ border: 1px solid #ddd; padding: 8px; text-align: center; }}
th {{ background-color: #f8f8f8; }}
.analysis-section {{ margin-bottom: 20px; padding: 10px; background-color: #e9ecef; border-left: 5px solid #007bff; }}
ul {{ list-style-type: disc; margin-left: 20px; }}
li {{ margin-bottom: 5px; }}
hr {{ border: none; border-top: 1px dashed #ccc; margin: 40px 0; }}
</style>
</head>
<body>
<h1>문장: '{sentence}' 어텐션 분석 결과</h1>
<p><b>토큰화된 문장:</b> {tokens}</p>
<p><b>총 레이어 수:</b> {len(attentions)}개</p>
<p><b>어텐션 스코어 해석:</b> 각 표는 특정 레이어와 헤드에서의 어텐션 가중치를 보여줍니다. 왼쪽 'Query' 토큰이 상단 'Key' 토큰에 얼마나 주의를 기울이는지 스코어로 나타납니다. 스코어가 높을수록 해당 Key 토큰의 정보가 Query 토큰의 표현에 더 중요하게 사용됩니다.</p>
<hr>
""")
# 모든 레이어 (0부터 model.config.n_layer - 1)
for layer_idx, layer_attentions in enumerate(attentions):
# layer_attentions는 (batch_size, num_heads, seq_len, seq_len)
# 배치 사이즈가 1이므로 squeeze(0)하여 (num_heads, seq_len, seq_len)로 만듭니다.
heads_attentions = layer_attentions.squeeze(0)
# 각 헤드 (0부터 model.config.n_head - 1)
for head_idx, attention_matrix in enumerate(heads_attentions):
# attention_matrix는 (seq_len, seq_len)
html_chunk = get_attention_table_and_analyze_html(
tokens, attention_matrix, layer_idx, head_idx, sentence
)
all_html_content.append(html_chunk) # 생성된 HTML 청크를 리스트에 추가
all_html_content.append("</body></html>") # HTML 푸터 추가
# 모든 HTML 내용을 하나의 문자열로 합치기
final_html_output = "\n".join(all_html_content)
# HTML 파일로 저장
with open(file_name, "w", encoding="utf-8") as f:
f.write(final_html_output)
print(f"\n분석 결과가 '{file_name}' 파일로 저장되었습니다.")
# Colab에서 파일 다운로드 링크 제공
files.download(file_name)
# 예제 문장 1
analyze_attention_and_save_html("나는 학교에 갑니다.", "school_attention_analysis.html")
# 다른 예제 문장 추가 가능
# analyze_attention_and_save_html("철수가 밥을 먹는다.", "korean_sentence_1_attention.html")
# analyze_attention_and_save_html("파란 하늘에 떠 있는 하얀 구름이 예쁘다.", "korean_sentence_2_attention.html")


※ 다른 예제 문장
# 다른 예제 문장
analyze_attention_and_save_html("철수가 밥을 먹는다.", "korean_sentence_1_attention.html")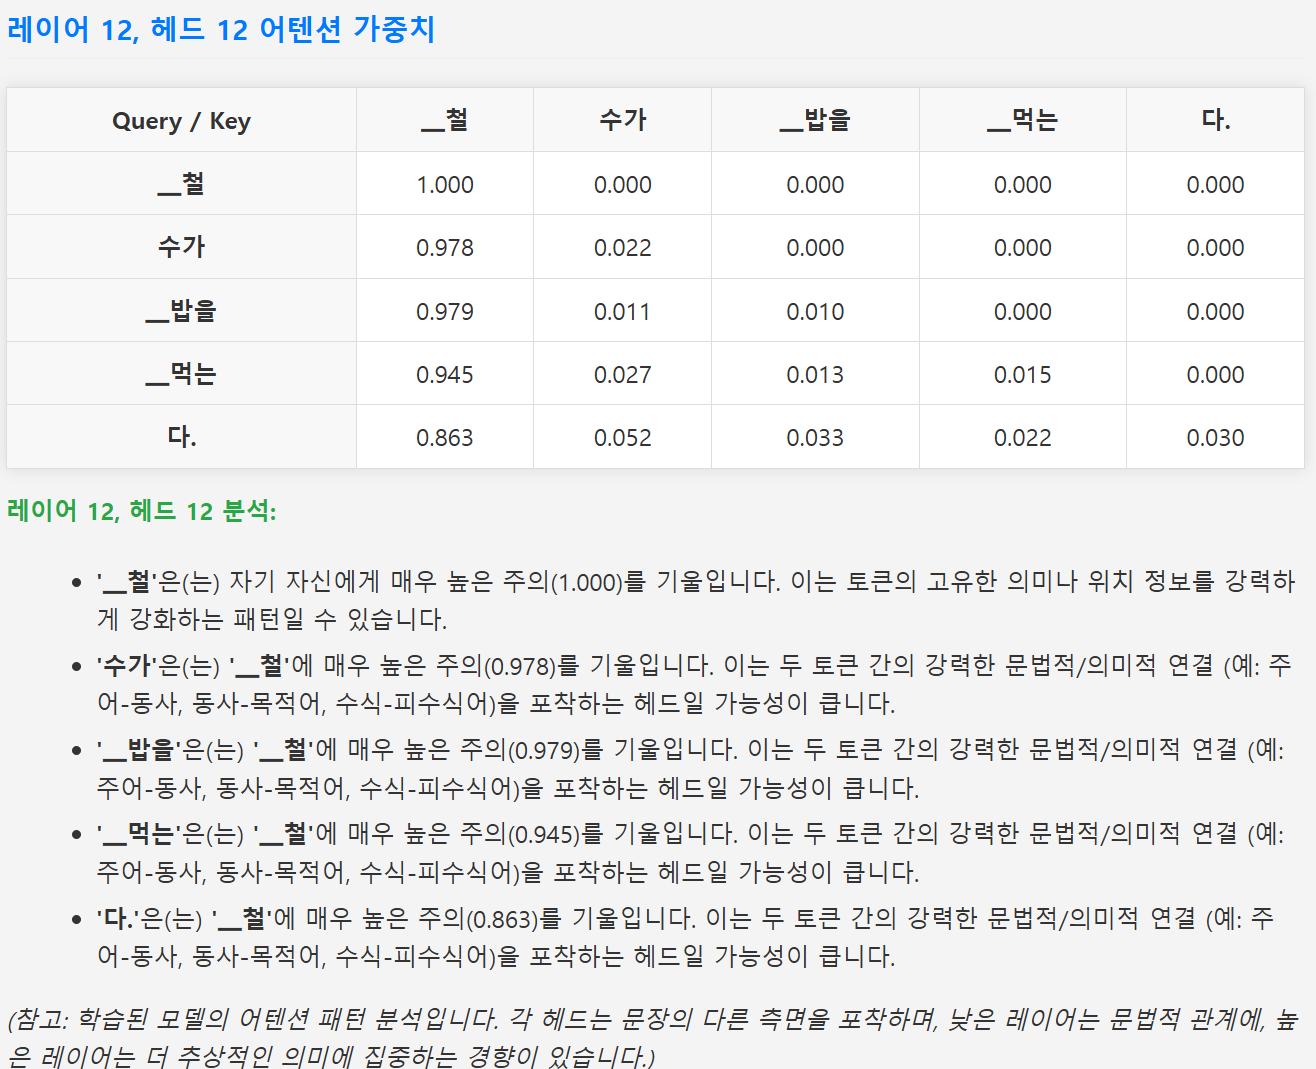
※ 다른 예제 문장
# 다른 예제 문장
analyze_attention_and_save_html("파란 하늘에 떠 있는 하얀 구름이 예쁘다.", "korean_sentence_2_attention.html")
2. ASR 모델 평가
ASR 모델의 성능은 대부분 예측된 텍스트와 정답 텍스트 간의 차이를 기준으로 평가한다.
📌 WER (Word Error Rate, 단어 오류율)
ASR 평가에서 가장 널리 사용되는 지표이다.
계산 방법:
WER = (S + D + I) / N
- S: Substitution (대체) - 정답 단어가 다른 단어로 인식됨
- D: Deletion (삭제) - 정답 단어가 인식되지 않음
- I: Insertion (삽입) - 존재하지 않는 단어가 추가로 인식됨
- N: 총 정답 단어 수
def wer(reference, hypothesis):
	# 공백 기준으로 텍스트를 단어 단위로 분리
    ref_words = reference.strip().split()
    hyp_words = hypothesis.strip().split()

    # 편집 거리 계산 후, 정답 단어 수로 나눠서 오류율 계산
    distance = levenshtein(ref_words, hyp_words)
    wer_score = distance / max(len(ref_words), 1)
    return wer_score
📌 CER (Character Error Rate, 음절/문자 오류율)
한글이나 철자 단위가 더 중요한 경우에 쓰인다. WER과 방식은 같지만 단어가 아닌 글자 단위로 비교한다.
def cer(reference, hypothesis):
	# 텍스트에서 공백 제거 후 문자 단위로 나눔
    ref_chars = list(reference.strip().replace(" ", ""))
    hyp_chars = list(hypothesis.strip().replace(" ", ""))

    # 문자 단위 편집 거리 계산 후 오류율 반환
    distance = levenshtein(ref_chars, hyp_chars)
    cer_score = distance / max(len(ref_chars), 1)
    return cer_score
📌 Accuracy (정확도)
단순히 정답 문장과 예측 문장이 완전히 일치한 비율이다. 문장 단위로 정확히 일치해야 정답으로 간주하므로 현실에서는 정확도가 낮게 나올 수 있다.
📌BLEU, ROUGE 등 (자연어 평가 지표)
기계 번역이나 요약 평가에 쓰이는 지표들을 음성 인식에도 사용할 수는 있으나, 보통은 WER, CER 중심으로 평가한다.
📌 ASR 모델 평가 방법
# -------------------------------
# 편집 거리 + 연산 추적 함수
# 거리를 계산하고, 치환, 삽입, 삭제의 횟수를 구하는 함수
# -------------------------------

def levenshtein_ops(seq1, seq2):
    m, n = len(seq1), len(seq2)     # 각 시퀀스의 길이 변수
    dp = [[0]*(n+1) for _ in range(m+1)]
    op = [[None]*(n+1) for _ in range(m+1)]  # 연산 기록

    for i in range(m+1):
        dp[i][0] = i        # seq2가 빈 문자열일 때, seq1의 각 문자들을 삭제해야 하므로
        op[i][0] = 'D' if i > 0 else None    # 'D'(삭제) 연산을 기록
    for j in range(n+1):
        dp[0][j] = j        # seq1이 빈 문자열일 때, seq2의 각 문자를 삽입해야 하므로
        op[0][j] = 'I' if j > 0 else None    # 'I'(삽입) 연산을 기록

    for i in range(1, m+1):
        for j in range(1, n+1):
            if seq1[i-1] == seq2[j-1]:     # 문자가 같으면 편집 비용 증가 없이 이전 상태를 그대로 가져오기
                dp[i][j] = dp[i-1][j-1]
                op[i][j] = 'E'  # 일치
            else:                          # 문자가 다르면 삭제, 삽입, 치환 각각의 비용 계산
                del_cost = dp[i-1][j] + 1
                ins_cost = dp[i][j-1] + 1
                sub_cost = dp[i-1][j-1] + 1
                min_cost = min(del_cost, ins_cost, sub_cost)    # 세 연산 중 최소 비용 선택
                dp[i][j] = min_cost        # 현재 위치의 편집 거리를 갱신
                if min_cost == sub_cost:
                    op[i][j] = 'S'  # 치환
                elif min_cost == del_cost:
                    op[i][j] = 'D'  # 삭제
                else:
                    op[i][j] = 'I'  # 삽입

    # 연산 추적
    i, j = m, n       # 역추적을 위해 시작 좌표를 dp[m][n]에서 시작
    subs, ins, dels = 0, 0, 0
    while i > 0 or j > 0:     # 시작점에서 0,0 까지 연산 추적을 역으로 수행
        if op[i][j] == 'E':   # 일치하면 양쪽 포인터를 한 칸씩 이동
            i -= 1
            j -= 1
        elif op[i][j] == 'S': # 치환이면 치환 수 증가, 양쪽 한 칸씩 이동
            subs += 1
            i -= 1
            j -= 1
        elif op[i][j] == 'D': # 삭제는 seq1 포인터만 감소
            dels += 1
            i -= 1
        elif op[i][j] == 'I': # 삽입은 seq2 포인터만 감소
            ins += 1
            j -= 1

    return dp[m][n], subs, ins, dels

# -------------------------------
# 평가 함수 (WER, CER + 정확도 + 세부연산)
# -------------------------------
# 단어 단위 WER 계산 함수
def wer_detail(reference, hypothesis):
    ref_words = reference.strip().split()   # 공백 기준으로 단어 단위로 분리
    hyp_words = hypothesis.strip().split()
    distance, subs, ins, dels = levenshtein_ops(ref_words, hyp_words)
    wer_score = distance / max(len(ref_words), 1)     # WER = 전체 단어 수 대비 오류 개수
    accuracy = (len(ref_words) - distance) / max(len(ref_words), 1)   # 정확도 = 맞춘 단어 수 / 전체 단어 수
    return wer_score, accuracy, subs, ins, dels

# 문자 단위 CER 계산 함수
def cer_detail(reference, hypothesis):
    ref_chars = list(reference.strip().replace(" ", ""))   # 공백을 제거한 뒤, 한 글자씩 리스트로 만듦
    hyp_chars = list(hypothesis.strip().replace(" ", ""))
    distance, subs, ins, dels = levenshtein_ops(ref_chars, hyp_chars)   # 문자 단위로 연산
    cer_score = distance / max(len(ref_chars), 1)
    accuracy = (len(ref_chars) - distance) / max(len(ref_chars), 1)
    return cer_score, accuracy, subs, ins, dels

# -------------------------------
# 예제 입력 및 출력
# -------------------------------

ref_text = "오늘 날씨가 정말 좋다"   # 참조 텍스트
hyp_text = "오늘 날시가 정마 좋다"   # 예측 텍스트

print("Reference :", ref_text)
print("Hypothesis:", hyp_text)

# WER
wer_score, wer_acc, wer_s, wer_i, wer_d = wer_detail(ref_text, hyp_text)
print("\n[WER 평가 - 단어 단위]")
print("WER (오류율)      :", round(wer_score, 3))
print("정확도 (Accuracy) :", round(wer_acc, 3))
print("치환(Sub)         :", wer_s)
print("삽입(Ins)         :", wer_i)
print("삭제(Del)         :", wer_d)

# CER
cer_score, cer_acc, cer_s, cer_i, cer_d = cer_detail(ref_text, hyp_text)
print("\n[CER 평가 - 문자 단위]")
print("CER (오류율)      :", round(cer_score, 3))
print("정확도 (Accuracy) :", round(cer_acc, 3))
print("치환(Sub)         :", cer_s)
print("삽입(Ins)         :", cer_i)
print("삭제(Del)         :", cer_d)
※ 다른 예제 문장
ref_text = "I want to go home"
hyp_text = "I want go to home"
ref_text = "밤에 밥을 먹은 범은 범상치 않았다"
hyp_text = "범에 밥을 먹은 밤은 상치 않았다"
3. Pretrained ASR Model 평가
- wav2vec 2.0
- 모델명 예시: facebook/wav2vec2-large-960h, facebook/wav2vec-large-xlsr-53
- 특징:
- 음성 파형을 직접 입력받아 자기지도학습 방식으로 학습된 대표 모델
- Whisper 다음으로 많이 사용되는 모델
- fine-tuning이 쉬움 (음성-텍스트 쌍 데이터만 있으면 가능)
- 그러나, 긴 문장을 처리할 때는 성능이 떨어질 수 있음
- Whisper보다 노이즈에 상대적으로 약함
- hubert
- 모델명 예시: facebook/hubert-large-ls960-ft
- 특징:
- wav2vec 2.0의 구조를 개선하여 더욱 효율적인 학습
- self-supervised 방식이며, 음성 분절화(feature clustering)를 통해 더욱 정교한 표현 학습
- 문장 수준에서의 인식 성능 우수
- XLS-R (Cross-lingual Speech Representations)
- 모델명 예시: facebook/wav2vec2-xls-r-300m, facebook/wav2vec2-xls-r-1b
- 특징:
- 128개의 언어를 대상으로 사전학습된 다국어 wav2vec2 확장 버전
- 대규모 파라미터(300M ~ 2B), 강력한 다국어 지원
📌 Pretrained ASR Model 평가
# 1. 데이터 다운로드
!wget -O KoreanReadSpeechCorpus.tar.gz https://www.openslr.org/resources/97/KoreanReadSpeechCorpus.tar.gz

# 2. 압축 해제
!tar -xvzf KoreanReadSpeechCorpus.tar.gz
from IPython.display import Audio, display
def play(index):
if index < 0 or index >= len(df):
print("잘못된 인덱스입니다.")
return
print(f"[{index}] 전사 문장:", df.iloc[index]["text"])
display(Audio(df.iloc[index]["wav_path"], autoplay=False))
# 예시 실행
play(230)
# 1. 필수 라이브러리 설치
!pip install -q transformers torchaudio librosa pandas

# 2. 라이브러리 임포트
import os, json
import pandas as pd
import librosa
import torch
from transformers import Wav2Vec2ForCTC, Wav2Vec2Processor
from IPython.display import display

# 3. 평가 함수 정의
# 치환/삽입/삭제 연산을 직접 추적
def levenshtein_ops(seq1, seq2):
    m, n = len(seq1), len(seq2)
    dp = [[0] * (n + 1) for _ in range(m + 1)]
    op = [[None] * (n + 1) for _ in range(m + 1)]
    for i in range(m + 1):
        dp[i][0] = i
        op[i][0] = 'D' if i > 0 else None
    for j in range(n + 1):
        dp[0][j] = j
        op[0][j] = 'I' if j > 0 else None
    for i in range(1, m + 1):
        for j in range(1, n + 1):
            if seq1[i - 1] == seq2[j - 1]:
                dp[i][j] = dp[i - 1][j - 1]
                op[i][j] = 'E'
            else:
                del_cost = dp[i - 1][j] + 1
                ins_cost = dp[i][j - 1] + 1
                sub_cost = dp[i - 1][j - 1] + 1
                dp[i][j] = min(del_cost, ins_cost, sub_cost)
                if dp[i][j] == sub_cost:
                    op[i][j] = 'S'
                elif dp[i][j] == del_cost:
                    op[i][j] = 'D'
                else:
                    op[i][j] = 'I'
    i, j = m, n
    subs, ins, dels = 0, 0, 0
    while i > 0 or j > 0:
        if op[i][j] == 'E': i -= 1; j -= 1
        elif op[i][j] == 'S': subs += 1; i -= 1; j -= 1
        elif op[i][j] == 'D': dels += 1; i -= 1
        elif op[i][j] == 'I': ins += 1; j -= 1
    return dp[m][n], subs, ins, dels

# 단어 단위 WER 계산
def wer_detail(ref, hyp):
    r, h = ref.strip().split(), hyp.strip().split()
    d, s, i, d_ = levenshtein_ops(r, h)
    return d / max(len(r),1), (len(r)-d)/max(len(r),1), s, i, d_

# 문자 단위 CER 계산
def cer_detail(ref, hyp):
    r, h = list(ref.replace(" ", "")), list(hyp.replace(" ", ""))
    d, s, i, d_ = levenshtein_ops(r, h)
    return d / max(len(r),1), (len(r)-d)/max(len(r),1), s, i, d_

# 4. 모델 목록 정의
model_list = {
    "kresnik-korean": "kresnik/wav2vec2-large-xlsr-korean",
    "kresnik-korean-v2": "kresnik/wav2vec2-large-xlsr-53-korean-v2",
    "xlsr-53": "facebook/wav2vec2-large-xlsr-53",
    "xlsr-300m": "facebook/wav2vec2-xls-r-300m",
    "xlsr-1b": "facebook/wav2vec2-xls-r-1b",
    "xlsr-2b": "facebook/wav2vec2-xls-r-2b",
    "960h": "facebook/wav2vec2-large-960h",
    "hubert-large-ls960-ft": "facebook/hubert-large-ls960-ft",
    "hubert-base-ls960": "facebook/hubert-base-ls960",
    "speechT5": "microsoft/speecht5_asr",
    "kocohub-wav2vec2-ko": "kocohub/wav2vec2-large-ko-ft",
    "etri-korean": "etri/wav2vec2-large-korean"
}

# 5. 미리 다운로드 (Processor + Model)
print("모델 다운로드 중...")
for key, path in model_list.items():
    try:
        _ = Wav2Vec2Processor.from_pretrained(path)
        _ = Wav2Vec2ForCTC.from_pretrained(path)
        print(f"{key} 다운로드 완료")
    except Exception as e:
        print(f"{key} 다운로드 실패:", e)

print("\n다운로드 완료. 이제 인식 평가 시작...\n")

# 6. JSON 데이터 로딩
json_path = "/content/Korean_Read_Speech_Corpus_sample.json"
with open(json_path, "r", encoding="utf-8") as f:
    data = json.load(f)

entries = []
for location, utterances in data.items():
    for uid, info in utterances.items():
        wav_path = f"/content/{location}/{uid}.wav"
        entries.append({"wav_path": wav_path, "text": info["text"]})
df = pd.DataFrame(entries)

# 7. 평가 대상 인덱스 지정
target_indices = [230]

# 8. 평가 수행
all_results = []

for model_key, model_path in model_list.items():     # 타겟 인덱스를 반복하면서
    print(f"모델 평가: {model_key}")
    try:
        processor = Wav2Vec2Processor.from_pretrained(model_path)
        model = Wav2Vec2ForCTC.from_pretrained(model_path).eval()

        for idx in target_indices:
            row = df.iloc[idx]
            wav_path = row["wav_path"]
            ref_text = row["text"].strip().lower()

            if not os.path.exists(wav_path):
                print(f"[{idx}] 파일 없음: {wav_path}")
                continue

            audio, _ = librosa.load(wav_path, sr=16000)    # 오디오 로딩
            # 입력 텐서 생성
            inputs = processor(audio, sampling_rate=16000, return_tensors="pt", padding=True)
            with torch.no_grad():
                logits = model(**inputs).logits
            pred_ids = torch.argmax(logits, dim=-1)
            pred_text = processor.batch_decode(pred_ids)[0].strip().lower()

            wer, wer_acc, s1, i1, d1 = wer_detail(ref_text, pred_text)
            cer, cer_acc, s2, i2, d2 = cer_detail(ref_text, pred_text)

            all_results.append({
                "model": model_key,
                "index": idx,
                "ref_text": ref_text,
                "pred_text": pred_text,
                "wer": round(wer, 3), "wer_acc": round(wer_acc, 3),
                "wer_sub": s1, "wer_ins": i1, "wer_del": d1,
                "cer": round(cer, 3), "cer_acc": round(cer_acc, 3),
                "cer_sub": s2, "cer_ins": i2, "cer_del": d2
            })
    except Exception as e:
        print(f"{model_key} 평가 실패:", e)

# 9. 결과 출력
result_df = pd.DataFrame(all_results)
display(result_df)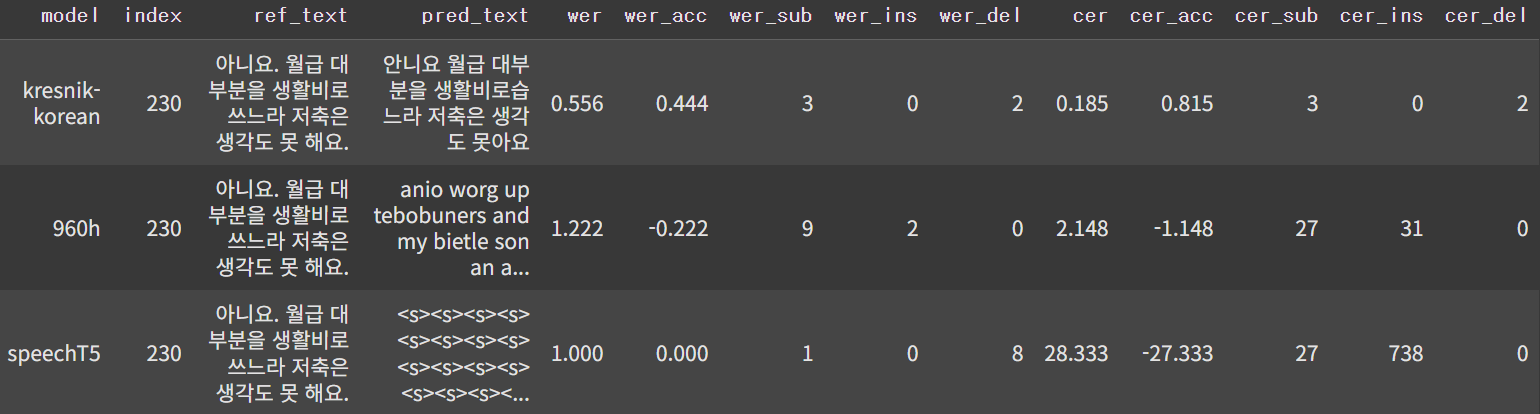
728x90
'음성처리' 카테고리의 다른 글
| [음성 합성]TTS 개념 및 주요 활용 사례 (0) | 2025.07.26 |
|---|---|
| [음성 인식]실습 정리 (0) | 2025.07.26 |
| [음성 인식]최신 ASR 모델(CTC, Transformer, Conformer, Self-Supervised Learning, Whisper) (0) | 2025.07.24 |
| [음성 인식]Attention 기반 ASR (2) | 2025.07.21 |
| [음성 인식]CTC 기반 ASR (1) | 2025.07.21 |


